How to repaint aircraft for FS2004 and FSX - Part 2
Lets start...
What you have to do first are the main colors of the livery, which are blue and grey in this case. For that, you need to pick the right color from a photo. Find a photo of a Korean Air Boeing 777-200 in bright daylight. Open the photo in Photoshop and use the Eyedropper Tool to load the blue color of the fuselage as foreground color. Then click on the layer group "LEFT PAINT HERE" to select it and click on the arrow on the left so it points down. Use the create new layer button to create a new layer. Double click on the new layer and change the name to "Blue". You can also right-click and select "Layer Proporties..." to edit the name of the layer.
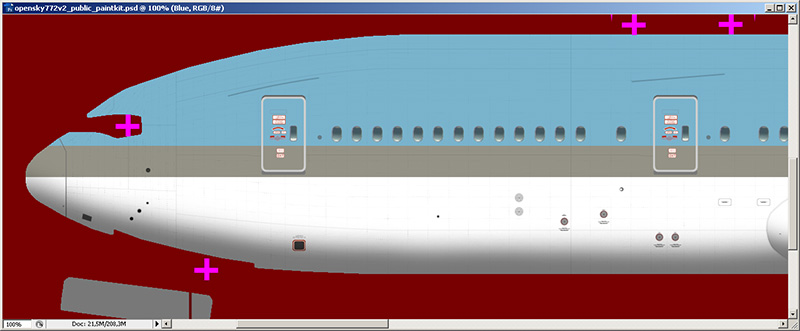
Before you can add the blue color to the fuselage, you have to know where it starts and ends. For that, you can use another photo of the Korean B777, a photo of the left side. In this case the blue ends just below the windows. Then use the Rectangular Marquee Tool to select the area on the fuselage that should become blue. Use the Paint Bucket Tool to fill the selection with blue so it looks like this:
In this case, the tail is also blue, so you can add blue to the tail part too. The line of grey is next. Create another new layer in the "LEFT PAINT HERE" group and name it "Grey". Do the same as with the blue color, select the part that should become grey with the Rectangular Marquee Tool and fill it with the tone of grey of the photo. Now it should look like this:
It already starts to look a bit like a Korean Air 777-200. It is time to put the main logo on the fuselage. Go to the top menu of Photoshop and click on "File". Then click on "Open..." and open the Korean Air logo you got from Best Brands of the World (the one with the Skyteam logo in it "Korean_Air.eps"). Now a menu comes up with rasterize settings. Photoshop wants to know how big the imported .eps image must be, or in other words: in what resolution do you want to load the image. In the spirit of "bigger is better" you have to use a higher resolution than needed. So you have to load the logo larger than it will be when placed on the fuselage. In this case, go for 2500x2500 pixels, which should be big enough.
When rasterized, you will see a big Korean Air logo in a new window within Photoshop. Drag and drop it to the paintkit so it becomes a new layer in the paintkit. Now use the Magic Wand Tool to select the white background of the logo layer and delete it so only the logo remains. Then use the Magic Wand Tool again to select the white color in the two letters "R" and "A" and delete it. Use the Rectangular Marquee Tool to select the Skyteam logo and delete it as well. If done right, the only thing remaining is a clean Korean Air logo.
Next thing is to resize and place the logo. For that you can use the Free Transform mode. First use the Zoom Tool to zoom out a bit, go to the menu on top, click on "Edit" and then on "Free Transform".
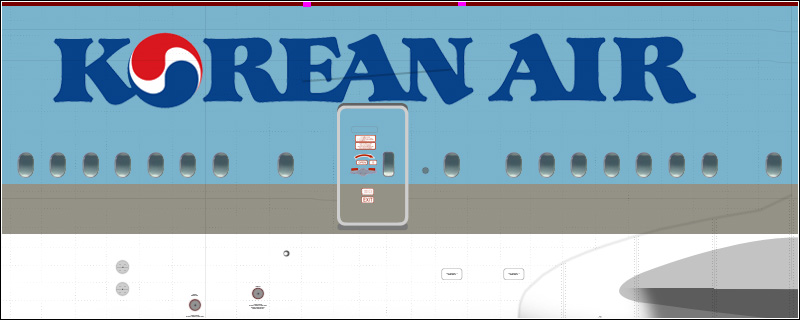
Now a rectangle appears around the logo which you can use to resize and position the logo. Click on one of the corners and hold shift when you start to resize (otherwise the logo will not stay in proportion). To move the logo, click somewhere in the logo and move the mouse while you hold the left mouse button. In the screenshot below, you see the logo resized and placed correctly.
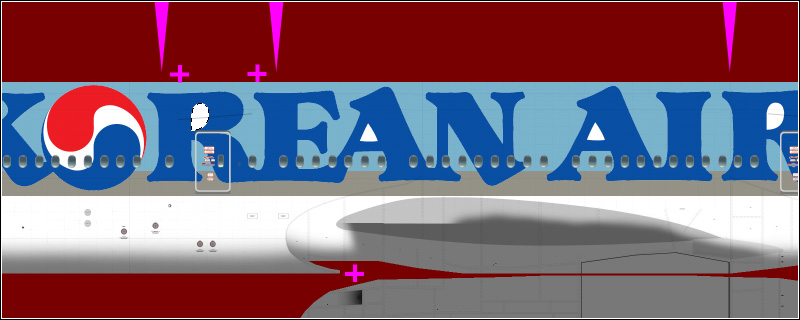
You just have to do one more thing with this logo. As you can see on the screenshot above, the logo looks right, no deformation. However, as it is right now, the logo will appear stretched in FS, especially when you look on the aircraft from above. This is due to the fact that the fuselage is round. To compensate, you have to shrink the height of the logo.
In the screenshot below, it is clearly visible that the logo appears vertically stretched.
Installation of the aircraft model
After shrinking the height, you need to export from the paintkit to the actual textures, so you can check if the logo looks right in FS. Before you can do that, you need the Boeing 777-200 installed in FS. This needs to be the right model with the right engine type. Korean Air is using Pratt & Whitney (PW) engines on their 777 fleet, so you need a PW model. Since there is already a Korean Air livery available on the Project Opensky website, it is best to download it and use it for your own paint. All liveries that are available on the Project Opensky website includes all the model files, so that is easier.
In case you are going to paint a livery that is not available (yet) on the Project Opensky website, you would have to download the model files on their model files page. In this case that would be the PW4000 (OS772V2_PW4000) model, which is available here. So go ahead and download the Korean Air livery:
https://www.projectopensky.com/downloads.php?aircraft=842ytv5p8&location=asia
NOTE: If you are going to paint a livery that doesn't exist yet on the Project Opensky pages, you still have to download at least one of the liveries for the other required files like the .air file and panel files. In that case download a livery with the same engine type as the one you are going to paint.
Why paint this livery when it is already available? Well, the Korean Air livery is not that hard to paint, so it is a good choice for the purpose of this tutorial. For that reason it doesn't matter if it has already been done before. Other reasons besides this tutorial could be: 1. You want to do it yourself, so you can be proud, 2. The existing livery is crappy and you can do it better. It seems that the last reason is another good argument in this case...
Anyway, go ahead and unzip the file "OS772V2_PW4000_KAL.zip" to a temporary folder. Then go to that temporary folder and move the folder "OS772V2_PW4000_KAL" to the main aircraft folder of FS2004 or FSX. The locations of those folders are (on a Windows XP machine when FS is installed on your C: drive):
FS2004: C:\Program Files\Microsoft Games\Flight Simulator 9\Aircraft\
FSX: C:\Program Files\Microsoft Games\Microsoft Flight Simulator X\SimObjects\Airplanes\
Now go to the paintkit folder and look for the folder "Effects". Copy the contents of that folder to the main effects folder of FS2004 or FSX:
FS2004: C:\Program Files\Microsoft Games\Flight Simulator 9\Effects\
FSX: C:\Program Files\Microsoft Games\Microsoft Flight Simulator X\Effects\
Now you have installed the aircraft, so you can move on and replace the livery textures with the white/blank textures of the paintkit.
ALPHA CHANNEL = The storage area in a texture file for non-visible picture elements. Like a mask, the darkest areas of an alpha channel are most transparent, white areas are opaque, and shades of gray represent varying levels of transparency, which is the level of reflection in this case.
MIPMAPS = Mipmap textures are clones from the base texture, but in smaller resolution (size). For example, a 1024x1024 texture includes 3 copies of the same texture, one in 512x512, one in 256x256 and one in 128x128. When looking from a distance on the aircraft, the smallest texture is loaded, which will save lots of memory and will increase the performance. The closer you come to the aircraft, the bigger texture is loaded, so it maintains sharpness. Without mipmaps, the video card will still compute non-visible pixels from the big texture, even if you're looking at the aircraft from a far distance. While this sounds all very nice and efficient, it doesn't work very well in FS and can cause some delay in texture loading, depending on CPU speed and video card performances. Especially when you zoom in quite fast, you will see a blurred texture for a moment. For that reason we save all textures of the aircraft without mipmaps.
Return to the paintkit folder, open it and then open the folder "Engines" and finally open the folder "PW". Now you should see 6 textures. Copy the following textures to the texture folder of the downloaded Korean Air B777-200:
Os777_pw4000_Fan_blurred.bmp
Os777_pw4000_Fan_Slow.bmp
Os777_pw4090_L.bmp
OS777_PW4090_Parts_L.bmp
The other 2 files (OS777_PW4090_Parts_t.bmp and Os777_pw4090_t.bmp) seem to have a problem that will cause FS to crash to desktop, so that is why we don't want to overwrite those. Instead, you have to open and save them with Dxtbmp. Start Dxtbmp and click on "File" on the left top of the window. Then click on "Open" and browse to the paintkit folder and open the file "OS777_PW4090_Parts_t.bmp" which is in the Engines/PW folder. Check if both check-boxes are not checked at the MipMaps settings on the right. Click on "File" again and then on "Save as" and select "Extended Bitmap". Now the save file window will pop up. Select "Extended 32 bit 888-8". At "Save in:", browse to the texture folder of the B777-200 (e.g. for FS2004: C:\Program Files\Microsoft Games\Flight Simulator 9\Aircraft\OS772V2_PW4000_KAL\texture.KAL\ or for FSX: C:\Program Files\Microsoft Games\Microsoft Flight Simulator X\SimObjects\Airplanes\OS772V2_PW4000_KAL\texture.KAL\ ). Now you can hit the save button and choose to overwrite. Do the same for the other file, Os777_pw4090_t.bmp.
Return to the paintkit folder, open it and then open the folder "fuselage" and then open "White layout". Copy all 6 textures to the texture folder of the downloaded Korean Air B777-200. Choose "overwrite" when asked. Ignore the folder "Ground Service Vehicle", those textures are not working, so keep the ones provided with this livery. Now open the folder "Wings" and then open the folder "Standard". Copy the 4 texture files (only the ones that end with .bmp, you can ignore the other files) to the texture folder of the downloaded Korean Air B777-200. Choose "overwrite" when asked.
| NEXT PAGE |